How to Gain Local Administrative Rights on a Domain Joined PC

Prerequisites
CD or USB bootable disk with WinPE or Windows Installation media
Save the script at the bottom of this page to a folder on the C drive of your PC, preferably something like c:\temp\ and save it with filename MakeSIDAdmin.vbs
Step 1 – Setup the BIOS and boot to Win PE or Windows Install Recovery
- Enter the BIOS of the PC. You will have to identify how to enter the BIOS from the make and model of your PC.
- Check if Secure Boot is enabled; if so, disable it.
- Save and exit the BIOS.
- Insert your Boot CD/USB. It should contain either Windows PE environment or the Windows installer for the same version of windows you have.
- Use the Boot options key (again you will have to identify this for the make and model of your PC) and select your USB/CD disk.
- Boot to your USB/CD. Once fully booted up, you most likely will have just a command line window.
Step 2 – Set PC to load CMD when it’s next booted up once booted in recovery:
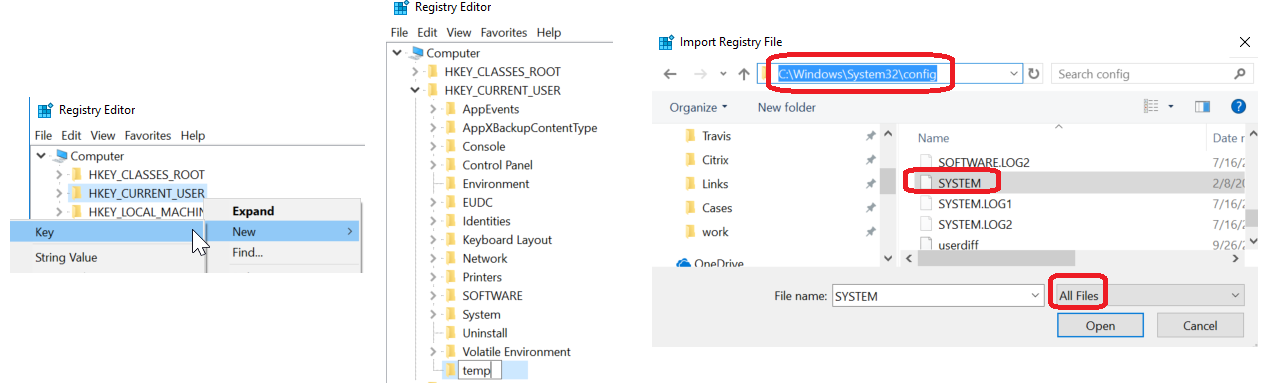
- Open regedit at command line by typing: regedit <enter>
- Right-Click on HKLM, then click New->Key.
- Name the key temp.
- Click on the new key you created named temp.
- Click File->Load Hive
- On the Open window, select All Files.
- Open the file named SYSTEM at C:\Windows\System32\config\
NOTE: Your C drive may not appear as drive letter C. You may have to explore to find the correct drive letter. - Open the Key: HKLM\temp\System\Setup
- Change value: CmdLine=cmd.exe
- Change value: SetupType=2
- Exit Regedit
- Reboot PC.
Step 3 – PC boots (not on USB/CD) up to Command line with admin rights. Now we create an admin user:
- In the command prompt, type:
net user NewAdminUsername YourPassword /add <enter> - You should not receive any error, if you do, review what you typed.
- In the command prompt, type:
net localgroup Administrators NewAdminUsername /add - Again, you should not receive an error.
Step 4 – If you also want to make your Domain user a Local Administrator:
- Find your Domain Username SID. To do this, in the command window, type: regedit <enter>
- Navigate to: HKML\Software\Microsoft\Windows NT\CurrentVersion\ProfileList\<THESE_ARE_THE_SIDs>
- For each Key in the ProfileList Key, click on the key and look for ProfileImagePath. If the path ends with your login username you use for the domain, you found the right Key.
- Edit the VBS script you copied onto your PC using this command (assuming you saved the file to c:\temp):
notepad c:\temp\MakeSIDAdmin.vbs - Now on the strSID= line, replace the existing SID with the one you got from the Registry. Be sure not to remove the double quotes.
- Save the file and exit it.
- In the command line, run the VBS script using (assuming you saved the file to c:\temp):
cscript c:\temp\MakeSIDAdmin.vbs
Step 5 – Set the PC to boot normally
- Open regedit at command line by typing: regedit <enter>
- Open the Key: HKLM\System\Setup
- Change value: CmdLine= <blank>
- Change value: SetupType=0
- Exit Regedit
- Reboot PC.
You should now have admin rights under the new user you created as well as the Domain user if you followed step 4. Note, if your Network Admins have a Group Policy that completely overwrites the Administrators group, this will be undone as soon as you logon to the network. Fortunately I’ve never been in a company that does that.
Other helpful info:
The Admin group SID is S-1-5-32-544
Make SID a member of Local Administrators Group VBS Code
Save the below as MakeSIDAdmin.vbs
strSID="S-1-5-21-3626170622-1311153608-2629030551-1399282"

set objUser=GetObject("WinNT://" & strSID)

set objGroup=GetObject("WinNT://./Administrators,group")

objGroup.Add objUser.ADsPath